Head
Spacing
Checking
Headspace with a Field Guage
(text and
photos extracted from a tutorial created by bunkysdad, Administrator,
russian-mosin-nagant-forum.com)
The definition of headspace when dealing with rimmed cartridge rifles
like the Mosin Nagant or Lee Enfield is simply the space allowed in a
rifle or pistol for the rim of the cartridge. Too small, and the bolt
won't close. Too large, and the case may stretch or allow hot gases to
unsafely leak into the chamber. While there are other types of
headspace guage tools available, the disc type headspace guage fits
easily on the bolt head without removing the extractor. This is a very
nice feature that makes a headspace check about a one minute process.
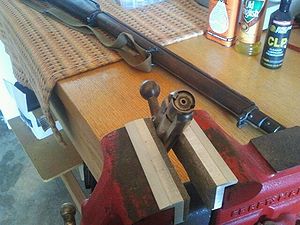
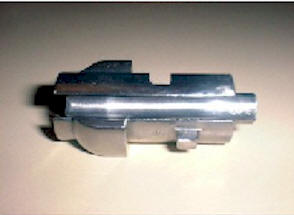
For the sake of illustration, I placed the bolt in a soft-jawed vise so
you can see where the tool fits. The guages are available in a
go-guage, a no-go guage,and a field guage. This illustration is being
conducted with a field guage, which is considered the largest amount of
headspace that is still considered safe to fire. The tool used is
available from Okie Headspace Guages. They can be found on the header
area of this forum, as they are a sponsor of the Russian Mosin Nagant
Forum.
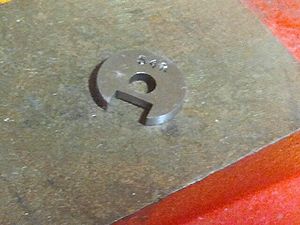
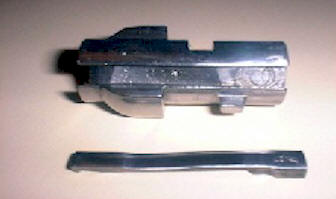
The tool is a precision ground coin like disc notched to clear the
extractor.
With rifle held vertically, place the disc on the bolt head and seat it
flatly with the notch clearing the extractor. It will lay completely
flat if it is positioned correctly.
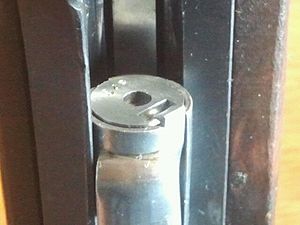
If the bolt will not close when applying gentle pressure the rifle
passes the field guage test.
The Headspace test would be the same with a tighter tolerance no-go
guage.
Choosing
a No-Go gauge or a Field Guage is a matter of preference. A go-guage is
not normally needed except perhaps by a gunsmith while installing a new
barrel or making extreme repairs.
This
Section is an older page on headspacing.
We just felt you might want to read it.
Headspacing
By:
Dave/Col9
collector9@usa.net
Safety Check!
Before attempting any type of activity with a firearm you must verify
that
the firearm is unloaded and safe to handle. Be certain that both the
chamber
and magazine are empty. Check again. It is also an excellent idea to
handle
firearms in an area without access to ammunition so that accidents can
be
avoided. Even if you have verified that the firearm is not loaded,
always
assume that it is loaded and ready to fire and handle it appropriately.
In the case of military surplus firearms, a thorough check by a
qualified
gunsmith is critical prior to using the firearm for the first time. The
procedures and opinions presented in this article are not meant to take
the
place of a professional gunsmith's services and are presented only for
the
education of the reader. It is anticipated that the reader will use the
information presented in this article only as a benchmark when deciding
whether a firearm should be purchased - not in place of a comprehensive
check by a qualified gunsmith. Remember that headspace is just one of
many safety
issues to verified by a professional.
Headspace - What is it?
In the case of rimmed 7.62x54R ammunition, the
ideal headspace is equal to
very slightly more than the thickness of the cartridge rim. Too little
headspace will prevent the bolt from closing completely (or not at all)
on
a cartridge. Too much headspace can result in a gap between the bolt
face and
the base of the cartridge (or a gap between the rim and chamber) that
can
cause a devastating release of high pressure gas into the receiver when
a
round is fired. The sudden release of this gas into an area of the
firearm
not designed to contain it can cause serious injury or death to the
shooter
and bystanders as the receiver disintegrates, and is not something to be
taken lightly.
Overview
This article presents an overview of how to check
headspace in a Mosin
Nagant series rifle. The first and primary check is performed using a
NO-GO gauge,
followed by a second check with a GO gauge. Many people consider the GO
gauge test as an optional procedure, as a rifle passing the NO-GO test
which is
subsequently able to chamber a round (at the range) is ready for
business.
I strongly recommend performing both a NO-GO and GO headspace check,
just to
be sure. $30 or so for a GO gauge is not a lot to spend when your life
is at
risk.
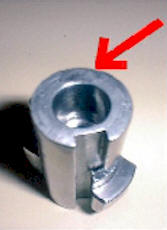
Coin type gauges are much easier to use. They require no disassemble of
the bolt head

Old style gauge

Although a FIELD gauge for 7.62x54R is available on the market, I have
personally decided not to fire any rifle that fails the NO-GO test.
Opinions, like mileage, may vary.
Differences between Gauges
A complete discussion of dimensions and tolerances
is beyond the scope of
this article; however, a brief discussion of the three available
headspace gauges
is necessary.
GO Gauge - A "GO" gauge is designed to test that the rifle's headspace
meets (at least) the minimum amount required to successfully / safely
chamber a
round. This gauge is normally used during the manufacturing process, or
during a re-barreling, when the chamber is reamed. A rifle must close
completely on the "GO" gauge to pass a headspace test. In my
experience, a
used or surplus rifle will rarely fail the "GO" gauge test, even with a
mismatched bolt.
NO-GO Gauge - The "NO-GO" Gauge is designed to imitate the maximum
amount of
headspace allowed when using reloaded or used cartridge cases. A rifle
must
NOT close on the NO-GO gauge to pass this test. If a rifle closes on a
NO-GO
gauge but not on a FIELD gauge (below) the rifle is considered safe to
fire
using factory new ammunition, but not safe to fire using reloaded or
used
cartridge cases. This is the most frequently failed headspace check,
especially amongst used or surplus military rifles with a mismatched
bolts.
FIELD Gauge - (AKA "Field Reject Gauge") The FIELD gauge is designed to
imitate the absolute maximum amount of headspace allowable for the
firearm.
If a firearm closes on a FIELD gauge it is unsafe to fire. Again, by
definition, if a rifle closes on a NO-GO gauge but not on a FIELD gauge
the
rifle is considered safe to fire using factory new ammunition, but not
safe
to fire using reloaded or used cartridge cases. I have chosen not to
rely upon
the FIELD gauge as a measure of safety in the firearms I own, but others
will put forth different opinions.
( For info on where to find gauges, see
the Mosin FAQ )
OK, How Do I Check Headspace?
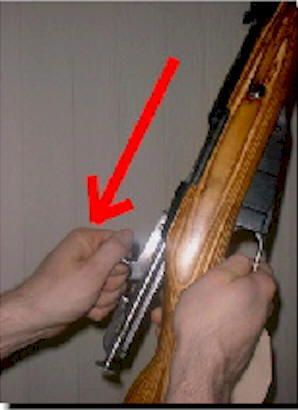
The first step is to remove the bolt from your
rifle. On Mosin Nagant
rifles, this is accomplished by opening the action and pulling the bolt
to the rear
while depressing the trigger. Be certain to keep a good grip on both the
bolt and the rifle during this operation (see photo).
Once the bolt is removed, it is necessary to remove the extractor from
the
bolt head in order to use an unmodified headspace gauge. Although it is
possible to grind a channel in the gauge (using a Dremel or similar
tool)
that would allow the extractor to remain in place on the bolt head
without
interference, I have decided not to perform this modification on any of
my
headspace gauges. I believe that such a modification carries the risk of
altering the gauge (burrs, etc) and causing problems. There are several
places on the Web where the merits of this modification are discussed
and I
would defer all questions to those more familiar with firearm
tolerances and
machine tool manufacture.
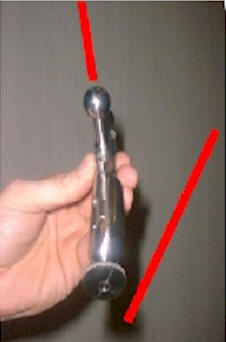
To remove the extractor, first remove the bolt head from the bolt body.
While holding the bolt in your left hand with the bolt head away from
your body
and the bolt handle in the upward position, pull back slightly on the
cocking
piece and turn the cocking piece approximately 1/8 turn clockwise (See
photo).
It is best to hold the bolt with the bolt head end
slightly elevated so
that the head doesn't fall off. Once the cocking piece is in the proper
position, the bolt head may be removed easily by pulling it straight
away from the
bolt body. My experience suggests that you should perform this
operation over a
surface such as a table so that the bolt head does not fall onto the
floor.
Leave the cocking piece in this position until the bolt head (without
extractor) is replaced.
Note: It is also possible to pull the cocking piece and turn it
approximately ¼ turn counterclockwise. I prefer the 1/8 turn clockwise
option, as only the bolt head is then removable. A ¼
counterclockwise turn of the bolt head will allow the complete
disassembly of the bolt.
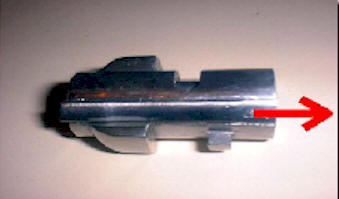
The next step is to remove the extractor from the bolt head. The
extractor
sits in a dovetail joint on the bolt head and is removed by using a
punch or
similar object to tap it to the rear (away from the bolt face; see
photo).
I use a hard plastic rod and a small hammer to perform this operation.
The
extractor is frequently frozen in place and significant force may be
necessary to free it. Be very careful not to damage the exposed end of
the extractor
while performing this procedure. An application of penetrating oil and a
quick prayer to the patron saint of Izhevsk usually helps.
Once the extractor is removed, be certain that the bolt head is
perfectly
clean and free of any buildup or oil (etc) on the bolt face. This is a
great opportunity to clean the built-up crud from beneath the
extractor. Put the
extractor in a safe place where it will not be bent or lost.
Install the bolt head back on to the bolt body and turn the cocking
piece
1/8 turn counterclockwise to its normal position (see photo).
It is best to hold the bolt with the bolt head end
slightly elevated so that the head doesn't fall off before the cocking
piece is turned.
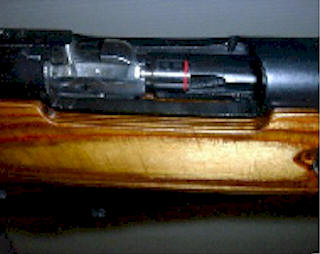
Put the bolt back in to the rifle. Be certain to
pull the trigger to the
rear while doing this to avoid damage to the sear (see photo).
Close the bolt completely to verify that it closes
without any resistance (you do not want to experience a "false
positive" when the headspace gauge is inserted....).
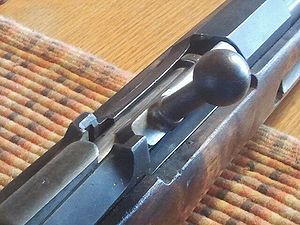
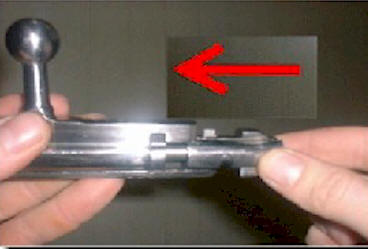
Turn the rifle so that the muzzle end is up. Open the bolt
approximately 1
½ inch and place the headspace gauge on the bolt face. If the bolt is
opened
more than 1 ½ inch, the interrupter / extractor will interfere with the
headspace gauge and the bolt will not close (see photo).
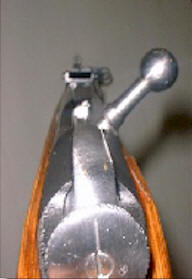
SLOWLY and GENTLY attempt to close the bolt. STOP the moment resistance
to
closing is experienced. I have found that most, if not all, Mosin Nagant
rifles with proper headspace will stop at the position shown in the
photo.
If the bolt closes completely without resistance, the rifle has failed
the
NO-GO headspace test. As I've stated, I will not fire (or purchase) a
rifle
that fails this test, even if it passes the same test using the "FIELD"
gauge.
Open the bolt 1 - ½" and remove the NO-GO gauge, replacing it with the
GO
gauge. The bolt should close without resistance.
If the bolt fails to close completely without resistance, the rifle has
failed the GO headspace test. This is a rare event. If you find a rifle
that
fails a GO test, bring it to a gunsmith and it is likely that the
chamber can be
"repaired" using a finishing reamer. This is best left to the
professional.
Open the bolt and remove the GO gauge. Remove the bolt from the rifle
and
take the bolt head off of the bolt body using the previously described
procedure.
Insert the extractor back into the bolt head (see photo)
and use a small hammer to tap it into place. The
extractor is seated properly when its base is flush with the back of
the bolt head (see photo).
Replace the bolt head on the bolt body using the previously described
procedure and put the bolt back into the rifle. Verify that the bolt
opens
and closed without resistance.
Hint: If the bolt will not close, open it completely and remove the
headspace gauge you left in the chamber. Pesky things, eh? If the
headspace gauge is stuck in the chamber, use a wooden dowel or a
cleaning rod inserted from the muzzle end to dislodge it.
I hope that this article is helpful. Please feel free to email any
suggestions or experiences that you want to share.
Dave/Col9
collector9@usa.net
|


