Cleaning

Safety First!
Before attempting any type of
activity with a firearm you must verify that the firearm is unloaded
and safe to handle. Be certain that both the chamber and magazine are
empty. Check again. It is also an excellent idea to handle firearms in
an area without access to ammunition so that accidents can be avoided.
Even if you have verified that the firearm is not loaded, always assume
that it is loaded and ready to fire and handle it appropriately.
In the case of military surplus firearms, a thorough check by a
qualified gunsmith is critical prior to using the firearm for the first
time. The procedures and opinions presented in this article are not
meant to take the place of a professional gunsmith's services and are
presented only for the education of the reader.
After assembling the bolt of
a Mosin Nagant firearm it is extremely important to verify firing pin
protrusion before firing
General
Disassembly
When you
get a Mosin you need to know how to disassemble it and do a complete
initial cleaning. Taking the Mosin apart is easy and can be
accomplished with just a screw driver. Remember, you are not a trained
gun smith nor do you or I play one on TV. and we darn sure didn't stay
in a Holiday Inn Express last night! So, what we will be doing is
performing field maintenance. Although some of you may be very
experienced in fixing up firearms, try to remember that these rifles
are old and age is not kind to metal or wood. A 50 year old stock is
going to be as dry as firewood and very brittle. Forcing out a band
spring can be all it takes to crack the stock. Likewise, a cross bolt
that is been in the rifle for 50 years may be stressed just enough to
snap. On war time produced rifles, the metal can be of lesser quality.
Note:
Read Everything On This Page!!!
Lets talk
about what needs to be disassembled.
First of
all there is no reason to mess with the cross bolt or barrel band
springs. Attempting to remove the cross bolt can result in its
breaking. Removing the band springs can result in a cracked stock if
not done correctly. We have beat this to death so lets move on...
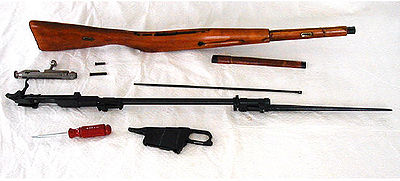
To do a
good inspection and cleaning, you will need to get the metal pieces
separated from the wood pieces. Some of the instructions that follow
will be model dependent so keep that in mind. Depending on the model,
the pieces-parts disassemble differently. For now we will discuss the
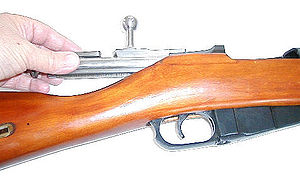
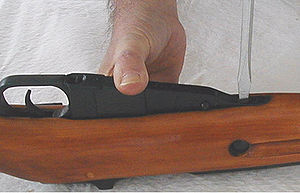
process in generic terms. The first thing you do when ever you pick up
a rifle is to open the bolt and inspect the chamber to ensure it is not
loaded! Each and every time you pick it up, you open the bolt, hold the
rifle up so that you can see into the chamber (tilted slightly and at a
45 degree angle) and visually check the chamber. After you have
satisfied yourself that it is not loaded, you grab the rear of the open
bolt while pressing on the trigger and pull it back and out of the
receiver.
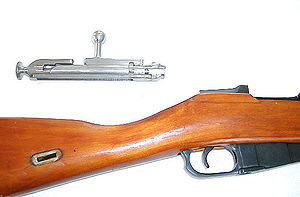
Set the bolt aside. At this time, you will remove the hand guard.
Remember I said some information is model specific? No? Well pay
attention dammit! I said that and if you read this article over you
will see where I said it. No, don't start reading it over now! Take my
word for it...anyways, here's the deal. If your rifle is a Model 1891,
Model 24 or other M91 variant, it will have different barrel bands than
the more modern Mosins. The barrel bands will have a screw in them. Now
here's the deal, these screws are backwards from normal screws. To
loosen them, you need to turn them clockwise. Stop! Don't try to think
about it now, just pay attention...that means that they unscrew in the
opposite direction a screw would normally unscrew. Why is this
important? Because I get all this mail from folks who break their band
screws. Do not break your band screw! It is embarrassing and finding a
new barrel band can be darned difficult. Another thing, these barrel
bands on the M91 type rifles were often pinned to keep the bands from
creeping forward under recoil. Check to see if there is a pin or tiny
screw inserted next to the barrel band and remove that. If it is a
screw, this screw will unscrew in the normal fashion. Once you have the
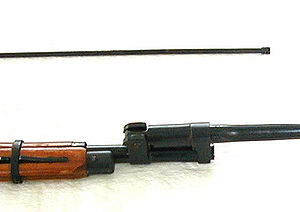
barrel bands unscrewed just enough to slide forward, remove them. Oh,
did I mention that if your rifle has a cleaning rod to go ahead and
remove that first? No? Well I didn't and I was just trying to see who
was paying attention! After you remove the barrel bands, remove the
hand guard and set it aside. Never mind gawking at the naked barrel,
you have work to do and there is plenty of time to do that later!
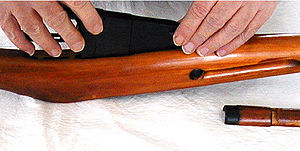
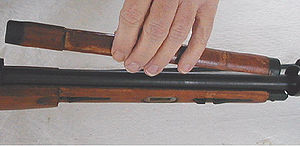
Now,
about barrel bands and later model Mosins...Again this will be model
specific. On converted Dragoons, carbines, 91/30's and later
constructed Mosins of other types like the 91/59 and 91/38, the barrel
bands are held in place by the band springs which are under them and
recessed slightly in the wood. They push up against the barrel bands to
keep them tensioned so that they hold the hand guard on. They also like
to collect all kinds of crap underneath them which makes it hard to
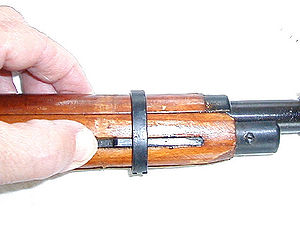
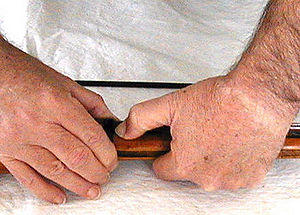
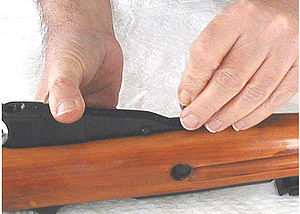
depress them to remove the barrel bands. Your first task is to
determine how much crap is under there and remove it. Push down on the
band spring. Push hard because this isn't a job for the wimpy! If it
resists depressing, get your self some round tooth picks and a syringe
filled with hot water. Grab the one your significant other's or mom's
that she uses in the kitchen. Just don't let her find out about it!
Inject a strong stream of hot water under the barrel bands. Why hot
water? Well, it will help to dissolve grease and cosmoline and will
flush out loose crap. It will also dry faster and be less prone to
corrode the band spring. Now, take your tooth pick and dig around as
best you can under the spring and pick that crud out of there. Once you
are satisfied you got all you that you can, try depressing the spring
again. It should depress enough to allow you to slip the barrel band
over it. If it doesn't, we go to plan B. I didn't tell you about plan B
yet you say...well of course I didn't because everybody knows that B
comes after A and we weren't there yet!

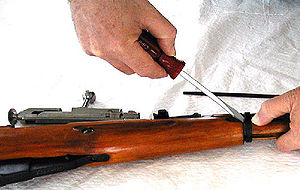
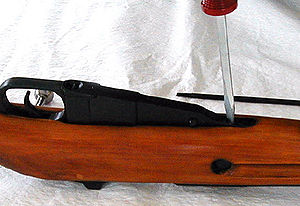
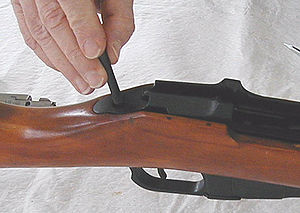
Plan B is the screw driver in the cleaning rod trick and it takes a
little finesse to keep from scratching the heck out of your stock.
First, obtain a flat blade screw driver no wider than the cleaning rod
channel. Turn your rifle upside down so that you are looking down at
the cleaning rod channel. What's a cleaning rod channel? Its the slot
were your cleaning rod was under the stock. Take your screw driver and
a couple of cleaning patches. Fold the patches over the tip of the
screw driver and insert the screw driver behind the barrel band between
it and the wood of the stock behind the rear band. Do not force it!
Wiggle the barrel band far enough forward to get the screw driver
behind it. Now, this takes some talent because you are going to balance
the rifle in your lap, while holding down the band spring with one hand
and using the screw driver with the other to ease the band forward over
the band spring. You need to do this in stages. Pry a little bit as you
press down and then while still pressing down, push the opposite side
of the band so that it does not bind on an angle. Keeping this up,
gently walk the band over the band spring. I say gently, but realize
that this will take a little force because what you will be doing is
spreading the band spring a little. If you were paying attention to
what you are doing, you would have noticed that the band spring is not
connected underneath therefore it can spread apart. Again, don't mess
up your stock while you are doing this!
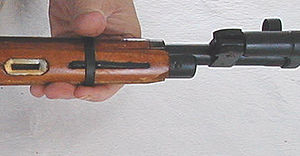
You can do the same thing with the front band. Now, remember I
mentioned model specific differences? No? Well wake up! I did and here
is another one. You cannot completely remove the barrel bands on a M44
Carbine. Don't try and as a matter of fact don't even think about it
and don't write to me asking how to take the bayo mount/front sight
assembly off to do so because that is even a dumber idea! Just slide
the darned things down towards the bayo mount so you can remove the
hand guard.
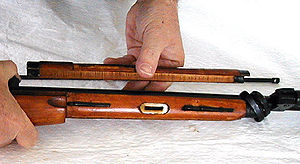
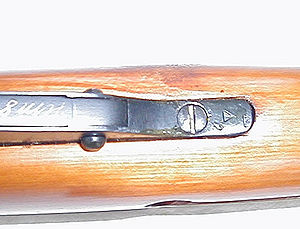
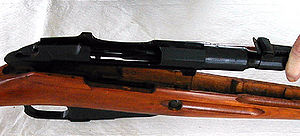
Now that we have the hand guard off, we can turn our attention to
separating the metal from the wood. Look at your rifle from the top.
See that area where the bolt was? At the very rear of that area as you
look down, you should see a screw head sticking out of the tang. You
can't see the screw because the bolt is in the way? I thought I told
you to remove the bolt? Failure to follow instructions is the sign of a
weak mind so next time pay attention. Now go ahead and remove the bolt
and look down there.
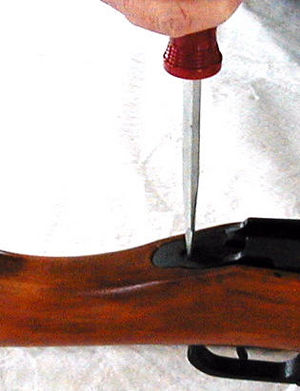
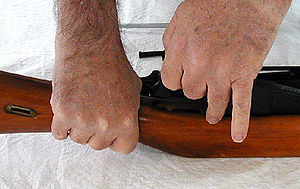
Using a larger flat blade screw driver, remove this bolt. Turn the
rifle over. Just in front of the magazine, you will see another big old
screw head. Remove this screw but make sure you are holding on to the
barreled receiver (the metal stuff) because the barrel and receiver may
just drop right out in your hand.
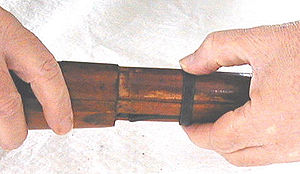
However it may not until you grab hold of the magazine and give it a
sharp pull to remove it.
After that, the barreled receiver should just drop right out but don't
let it! Remove it slowly because there just might be shims in there
that you need to note where they were.
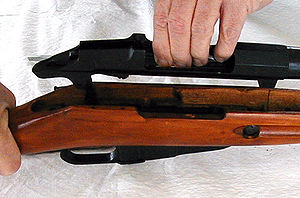
Most likely they will be under the pillar or the tang. If there was a
shim in the pillar area, note if it was behind the pillar or under the
pillar with the bolt that you took out running through it. Set these
aside and don't loose them because I won't be telling you how to make
new ones in this article. After you have removed the metal from the
wood, set the wood aside for a minute because we are going to check out
the metal. Start at one end and look for signs of active rust. Active
rust will be brown or reddish in color. Check the receiver part
(everything that is not your barrel) for cracks or deformities. Inspect
the barrel for deep pitting and bulges. Deep pitting is anything that
is deeper than your little brother's acne scars. Anything else should
be checked by a gun smith. Of course a bulged barrel means that you
have a wall hanger. After inspecting the outside of the receiver, it is
time to get down to cleaning it and the barrel. See the Cleaning
article.
The Bolt
The Mosin
Nagant bolt is frequently referred to by the uninitiated as
over-complicated, poorly designed, roughly finished or just plain ugly.
I must admit that, before becoming familiar with the Mosin Nagant
series of rifles and their history, I too considered the bolt to be old
fashioned and unsafe looking. The simple fact was that I had not
learned to appreciate the bolt design for what it is – an incredibly
efficient, robust design that is actually simple and easy to
understand. This unusual organization of seven pieces of steel has
withstood the test of time, battle and extraordinary political change.
In
addition, unlike many parts of the Mosin Nagant series of rifles, the
bolt has remained almost exactly the same – no matter if the firearm is
an 1895 M91 or a mid-1950’s M44. Although aesthetic differences do
exist between the various manufacturers, what other firearm design can
claim a bolt design that remained essentially unchanged through its
entire service life – of approximately 100 years! By unchanged I mean
that nearly* any piece of the Mosin Nagant bolt can be interchanged
without modification with a bolt from another Mosin Nagant rifle.
- NOTE:
Although bolt heads can be interchanged, the rifle’s headspace must be
verified after such a change is made. In addition, because bolt heads
are not generally marked with identifying numbers to match them to a
specific receiver, it is critical to have the firearm’s headspace
checked by a professional before firing a Mosin Nagant for the first
time. This is true even if the bolt body has a stamped serial number
matching it to the receiver. Remember, these rifles have been around
for a long time and parts may have been swapped (perhaps many times)
before you received the firearm. Safety first!
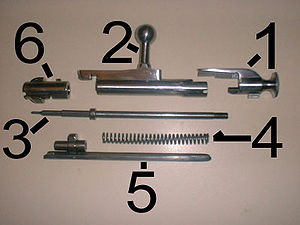
The
bolt is made up of seven individual pieces:
1)
Cocking piece
2) Bolt
body (also called the bolt handle)
3) Firing
pin
4) Main
spring
5)
Connecting bar
6) Bolt
head and extractor (2 pieces)
 ;SAFETY
CHECK! ;SAFETY
CHECK!
Take it from someone that
learned the hard way - the firing pin is under considerable spring
pressure. If the firing pin is unscrewed from the cocking piece without
being held in place, it may (will) fly in an unpredictable direction
and cause damage to itself, you, or a bystander. Follow the directions
below carefully and wear eye protection.
Never disassemble more than
one bolt at a time. This will prevent the interchanging of parts,
particularly bolt heads.
Bolt
Disassembly
There are
a number of methods to disassemble the Mosin Nagant bolt, all of which
work and each of which has its advantages and disadvantages. The method
I use does have an element of risk, in that the firing pin can be
broken when the spring is compressed and the cocking piece is removed.
Read the entire set of instructions carefully – if you are not
comfortable with each step – and the possibility of breaking a firing
pin if your hands slip (in Step 5), do not attempt this procedure.
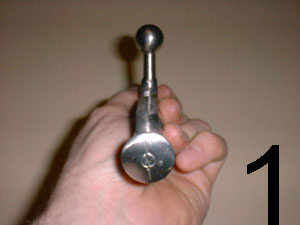
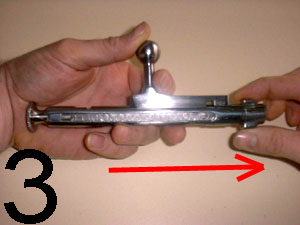
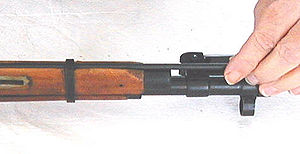
STEP 1:
While holding the bolt in your left hand as shown above, grip the
cocking piece with your right hand and pull it toward you slightly.
Turn the cocking piece counterclockwise ¼ turn and then gently let the
cocking piece move away from you. Keep the bolt head pointing upward or
it could fall off of the bolt body!
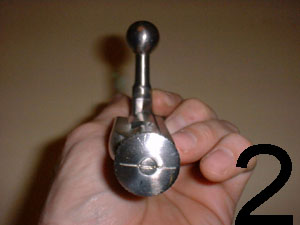
STEP 2:
The bolt should now look like this. I call this the bolt's "fired
position". Continue to hold the bolt head end upward!
STEP 3:
Hold the bolt as shown and pull the bolt head and connecting bar away
from the bolt body.
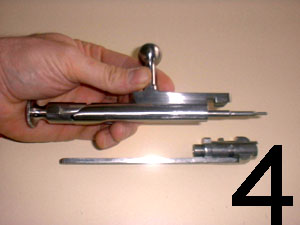
STEP 4:
Put the bolt head and connecting bar aside. Now for the hard part…
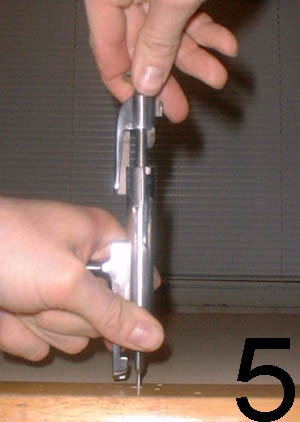
STEP 5:
This is where you can break the firing pin. The photo above shows
several “dimples” in my kitchen table that were created when I took the
photography for this article. My wife does not know where these dimples
came from and blames the kids. Please do not tell her the true story.
Any HARDWOOD surface will suffice for this step, but be thoughtful of
your marriage when selecting the “right spot”. Do not use metal – the
firing pin will skid and (possibly) break. Softwood will not support
the pressure and the firing pin will probably sink into it like a nail
(and possibly break).
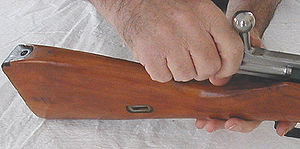
While
holding the bolt body in your left hand as shown, maintaining a perfect
90 degree angle from the hardwood surface, push down on the bolt body,
thereby compressing the spring, until you can turn the cocking piece in
a counterclockwise direction without hitting the bolt body. This is a
somewhat awkward procedure and considerable downward pressure on the
bolt body is necessary.
Continue
turning the cocking piece in a counterclockwise direction until you can
remove it from the firing pin. SLOWLY raise your left hand and
gradually release the spring pressure on the firing pin. When the
pressure has been completely released, remove the firing pin and spring
from the bolt body.
Hey – you did it!
- note:
Clean all of the parts while you have them apart, with special care not
to forget the inside of the bolt body and the inside of the bolt head.
Lightly lubricate the firing pin, spring and internal surfaces;
however, try not to get any oil on the exterior of the bolt body. Your
hands might slip later if you do…..
Bolt Assembly
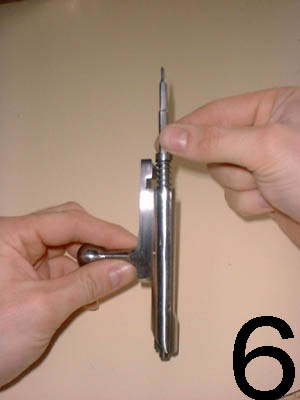
STEP 6:
Put the spring back on to the firing pin and insert both (as shown
above) into the bolt body.
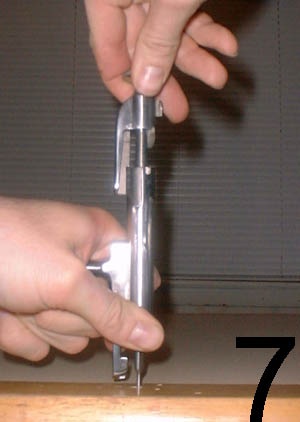
STEP 7:
As in step five, while holding the bolt body in your left hand as
shown, and while maintaining a perfect 90 degree angle from the
hardwood surface, push down on the bolt body and install the cocking
piece onto the firing pin by turning the cocking piece in a clockwise
direction. After you have turned the cocking piece clockwise three full
revolutions onto the threads, SLOWLY raise your left hand and gradually
release the spring pressure on the firing pin.
;
SAFETY CHECK!
Keep the firing pin pointed
away from anything important (such as your face) and wear eye
protection. I have mistakenly turned the firing pin in the wrong
direction in step 8, and it will fly off in a random direction if you
do this. Safety first!
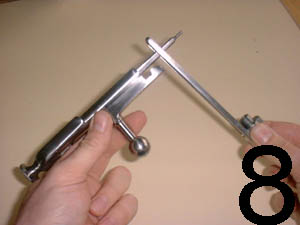
STEP 8:
Hold the bolt as shown above, and using the connecting bar as a wrench
(as shown above), turn the firing pin CLOCKWISE until….
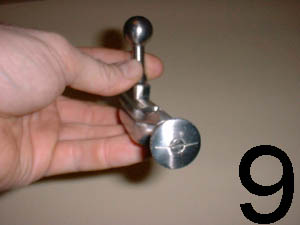
STEP 9:
the rear of the firing pin is flush with the cocking piece and the
index mark is aligned, as shown above. Be certain that the cocking
piece is in its “fired” position (turned 1/4 turn counterclockwise; see
step #2). If necessary, adjust the firing pin again using the
connecting bar as a wrench (see step #8).
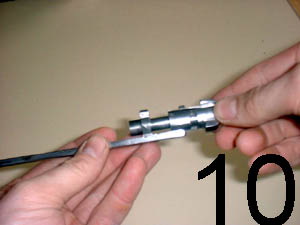
STEP 10:
Put the bolt body assembly aside for a moment and pick up the
connecting bar and bolt head. While holding them as shown above, slide
the bolt head on to the end of the connecting bar…
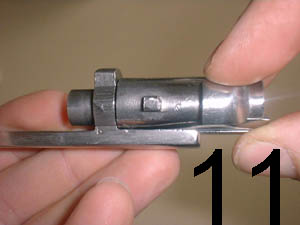
STEP 11:
…and turn it ¼ turn counterclockwise to the position shown above.
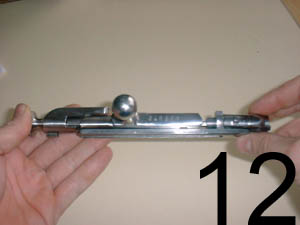
STEP 12:
While holding the bolt body assembly in your left hand and the
connecting bar/bolt head in your right hand as shown above, slide the
connecting bar/bolt head onto the bolt body. Make certain that the
connecting bar’s left end mates with the “nub” (cocking notch) on the
cocking piece.
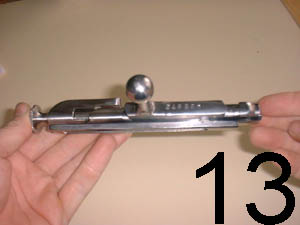
STEP 13:
This is what you should end up with. While holding the bolt head and
connecting bar in place on the bolt body…

STEP 14:
…rotate the entire assembly and hold it as shown above. Grasp the
cocking piece in your right hand, and while continuing to hold the bolt
head in place, pull the cocking piece toward you and simultaneously
rotate it ¼ turn clockwise…
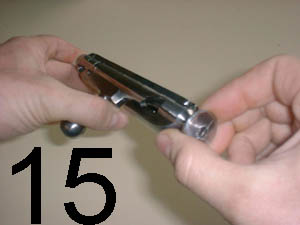
STEP 15:
…until it clicks into place as shown above.
You have successfully assembled the bolt!
;
SAFETY
CHECK!
Be certain to check the
firing pin protrusion using the screwdriver / protrusion tool found in
a standard Mosin Nagant Cleaning kit. If you do not have this tool, the
cleaning kit is well worth the money and can be obtained from most of
the better known Internet firearms vendors. Failure to check firing pin
protrusion can result in insufficient protrusion and the awful
"click........". Excessive firing pin protrusion can result in pierced
primers and a sudden release of high pressure gas into the receiver.
Both situations are extremely dangerous and can cause severe injury or
death to you and bystanders.
First,
verify that the bolt is in its "fired" position and that the firing pin
is flush with the cocking piece (see step 2, above). The index marks
must be aligned.
Second,
as shown below, the firing pin must (at least) touch the top of the
milled out area below the number "75" on the protrusion gauge. If it
does not, firing pin protrusion is insufficient. Be certain that there
is no gap between the bolt head and bolt body (hold them together) when
performing this test.

Finally,
the firing pin must *not* touch the top of the milled out area under
the number "95". If it does, firing pin protrusion is excessive.
Although
it is possible to adjust firing protrusion in the field, a matched bolt
should not have this problem, assuming the firing pin and the cocking
piece are flush and the index marks are aligned. A bolt failing the
protrusion test under these circumstances is suspect and must be
checked by a qualified gunsmith.
Bottom
line: Be safe and use common sense!
Cleaning Your Mosin
Now that
you have successfully disassembled your Mosin, you are ready to clean
it. You don't have it disassembled yet? Well go back and do it and make
sure you read the article and not just go and try pulling it apart on
your own! There are reasons for this other than increasing my page
hits!
Now, for
the rest of you that have properly disassembled your Mosin, lets talk
about cleaning it. First of all, we want to clean it while preserving
its collectable status. Using improper cleaning methods can destroy its
value as a historic firearm. What do you mean its not historic because
its just another old M44? Don't get me started! Just go look in your
gun safe or closet and tell me how many 1903 Springfield rifles are in
there or how many Mausers with all matching numbers and Waffenampt
stamps? Probably not a heck of a lot because you can't find them any
more. There were millions made and they were all either placed in
collections or messed up and destroyed through home workshop projects
and improper cleaning. Your M44 might be cheap rifle today but twenty
years from now, it could be one of a hand full on the open market when
you get ready to sell it for the money to pay your nursing home bill!
Even though it might be mismatched, if you knew your Mosin history, you
would know that when it comes to Mosins, they are expected to be
mismatched. Now where the heck was I? Oh, yes...cleaning and preserving
the rifle's value. The first rule of thumb is (repeat after me...) Do
No Harm. Do not do anything that will harm the finish of the rifle,
it's markings or stock cartouches. Try to keep the original finish
intact if at all possible. This means we need to select cleaning
materials that are non-destructive.
So there
you are with all of your Mosin parts spread all over the kitchen table
and you are getting nasty looks from your significant other or parent.
Hopefully you remembered to put a drop cloth or news papers down first!
If not, don't blame me because I am not responsible!
Now, lets
approach what materials we will need based on what we need to clean.
Cleaning
the Stock
For the
stock, you will need a non-abrasive, non-volatile cleaning product that
will not remove the finish from your stock. Since finishes are either
oil based or alcohol based, we need something that will not contain
petroleum products or alcohol. We recommend Kotton Cleaner or a mild
citrus based cleaner. Check your cleaner on a small un-noticable
section of your stock before use of any cleaner. It should cut the
grease and cosmo without harming the finish. You will need plenty of
rags or paper towels and plenty of elbow grease to get the gunk off.
The
stock, spray an area of the stock with your stock cleaner and remove
the larger portion of crud and cosmolene. Methodically cover the the
entire stock and get the major crud off and then go back and clean the
rest and pay attention to getting the crud from around the outside of
the cross bolt and out of the band spring inlets. Use a toothpick to
for this job as it won't harm the finish. Allow the stock to dry.
Cleaning
the Metal
For the
metal, you need a good degreaser like break cleaner or Gun Scrubber.
You also need some a solvent like paint thinner, turpentine or good old
fashioned kerosene. Don't know where to buy kerosene? Look no farther
than your corner gas station as diesel fuel is nothing more than
upwardly mobile or refined kerosene. Once you have your cleaning
products assembled, you can get started on the cleaning.
Spray the
receiver and barrel as well as the magazine assembly inside and out
with a degreaser. Wipe down the outside and then run a cleaning rod
with a patch through the barrel to push the crud out of there. Go back
over the inside and outside of the receiver with your degreaser and get
the film off from it. Use your break cleaner to spray into the
feeder/interrupter assembly to clean that. If you are really
adventurous, you could disassemble that and the trigger assembly and
clean these parts separately. Soak a patch in your break cleaner and
run it through the bore to clean the residue out of there. Now, grab
your chamber brush...what? You mean you don't have a chamber brush?
Well go get one because you are going to need it. Did you read my list
of Mosin tools? While you are at it, if you don't have one already, dig
out your three piece cleaning rod and attach the chamber brush to just
the handle piece as you would attach a jag for pistol cleaning. Squirt
a health amount of break cleaner into the chamber and scrub the heck
out of it with the chamber brush! Make sure the brush contacts every
nook and cranny in there. Concentrate on the locking ring area and the
chamber walls. When these rifles were placed in storage, they were
packed with cosmolene. Over the years that cosmolene dried out and
formed a nearly transparent film in the chamber. If you don't get that
film, it will cause you all kinds of hassles later on with extracting
rounds that are lacquer coated. When you are thinking it is clean,
scrub it some more and then finish off with your chamber brush
liberally soaked with Sweet's 7.62. I can't say enough about this
product. It is the best bore cleaner on the market and it does an
outstanding job on the chamber.
Now, before you go to the fridge for your favorite beverage or pour
yourself a cup of coffee, get an old pan and fill it with solvent and
toss your bolt parts and magazine assembly in there and let them soak.
Go ahead and release the floor plate latch of the mag assembly and
remove the floor plate by pinching it like one of those spring
clothespins. Dump everything in th solvent. Go enjoy your coffee, smoke
a butt or play with mamma and get back here to finish up. Done
already??? Heh, heh, gettin' old huh? Well no matter...back to the
bolt. All of those bolt pieces are hollow from the bolt head to the
bolt guide, the bolt body and the cocking piece. That means that there
are plenty of places for crud to collect. Get yourself a small Phillips
screw driver (star point if you are from Podunk) and stick a patch on
the end of it. Pull the bolt head out of the solvent it was soaking in
and stuff that patch inside it and rotate it. You might have to get
something to hook the patch back out with. Give the bolt head a final
squirt of break cleaner (inside and out) and dry patch it. Do the same
thing with the bolt guide, bolt body and cocking piece. when you are
done, the metal should be dry and free of any oily or greasy film. Do
the same thing with the magazine assembly. Coat everything with a light
coat of your favorite gun oil. Pull the spring and firing pin out of
the solvent and spray them down with the break cleaner and wipe dry and
coat with gun oil too.
Now
before you get all excited and want to put everything back together
again, don't forget to clean the bore. Remember we only got the crud
out but we didn't do any serious cleaning. I like to start out by using
Sweets and I run several patches through to get out the last century's
worth of copper fouling. What? You said the dealer told you this rifle
was un-issued? Yeah, ok...if you want to believe that go ahead but
trust me, use the Sweets. You will be surprised at what comes out of
your bore. Now if you look down that puppy and it looks a little dark,
I might suggest picking up some J&B Bore Paste not to be
confused with JB Weld!!! Remember, J&B Bore Paste....are you
listening to me??? Quit thinking about getting your gun out to the
range and pay attention....J&B Bore Paste! Use as directed and
you will be happy you did. I have resurrected some real sewer pipe
bores with this stuff.
Now we are ready to put everything back together so clean up your mess
before you end up sleeping in the garage and put your cleaning stuff
away and go back back to the Disassembling Your Mosin Article.
Reassembly
For
reassembling the bolt see article above ("Bolt Assembly").
OK...now,
pick up your stock and the barreled receiver. Hold the stock in a
horizontal upright position. If there were shims in there before, put
them back to where they were. Now pick up your receiver and lower it
into the stock.
Turn the
stock over and put the magazine assembly back on.
OK...now, pick up your stock and the barreled receiver. Hold the stock
in a horizontal upright position. If there were shims in there before,
put them back to where they were. Now pick up your receiver and lower
it into the stock.
Don't forget to reattach the floor plate. Make sure the mag housing is
seated properly and pinch it against the receiver assembly by squeezing
it and the top of the receiver with the stock in between and drop the
mag housing bolt in and hand tighten.
Now rotate the rifle right side up and drop in the tang bolt and
tighten with a screw driver and go back and tighten the magazine bolt
with a screw driver.

Now you are ready to put the hand guard back on. Place the hand guard
on top of the barrel and line it up properly.
Take the rear barrel band because it would be pretty dumb to put the
front one on first and make sure the joint is pointed down and slip it
past the front band spring and slide it back to rear and over the rear
band spring until it clicks into place.
Now do the front band.
Remember
the model specific stuff we mentioned before? On your M91, slide the
rear band on with the crack pointed down and the screw head on the
right side of the barrel as you are looking down range. Slide it all
the way back and replace the pin or screw you removed earlier. Don't
tighten it yet. Do the same with the front band. You did remember to
put the hand guard on first didn't you? Now you know why I said not to
tighten it yet! Now, you can tighten the rear band by turning the screw
which way? Well...I'm waiting? Don't look up there on the page, you
should know this by now! That's right...clockwise! Same goes with the
front band.
Now,
replace the cleaning rod and screw the darned thing in so it doesn't
come snaking out of its hidey-hole while you are shooting the rifle at
the range!
When you are done with that, you can reinsert the bolt by depressing
the trigger and sliding the bolt home.
Now....look
at the table and tell me if there are any parts left over?
If
not, you are done!
If
there are, go to the top of this page and start over. LOL
Secondary Cleaning Page
|


